Disclaimer

The following example uses the beta Azure CLI for now. The CLI change is not yet available in the stable release of Azure CLI.

When deploying from Github Actions to Azure you have to Login to Azure with the azure/login action. This action requires a Service Principal secret which can be stored in Github secrets. However, these secrets are available in Github workflow using them and can even be written to the output with echo for example.

With the new azure/login@v1.4.0 action you can use Federated credentials to login to Azure. Because this feature essentially establishes a trust between Github and Azure Active Directory there is no need for a password/secret anymore.

Create App registration and Federated Credential in Azure

First start by creating a normal AppRegistration in Azure Active Directory. After that go to Certificates & secrets and then to the tab Federated credentials.

Federated Credentials in AAD

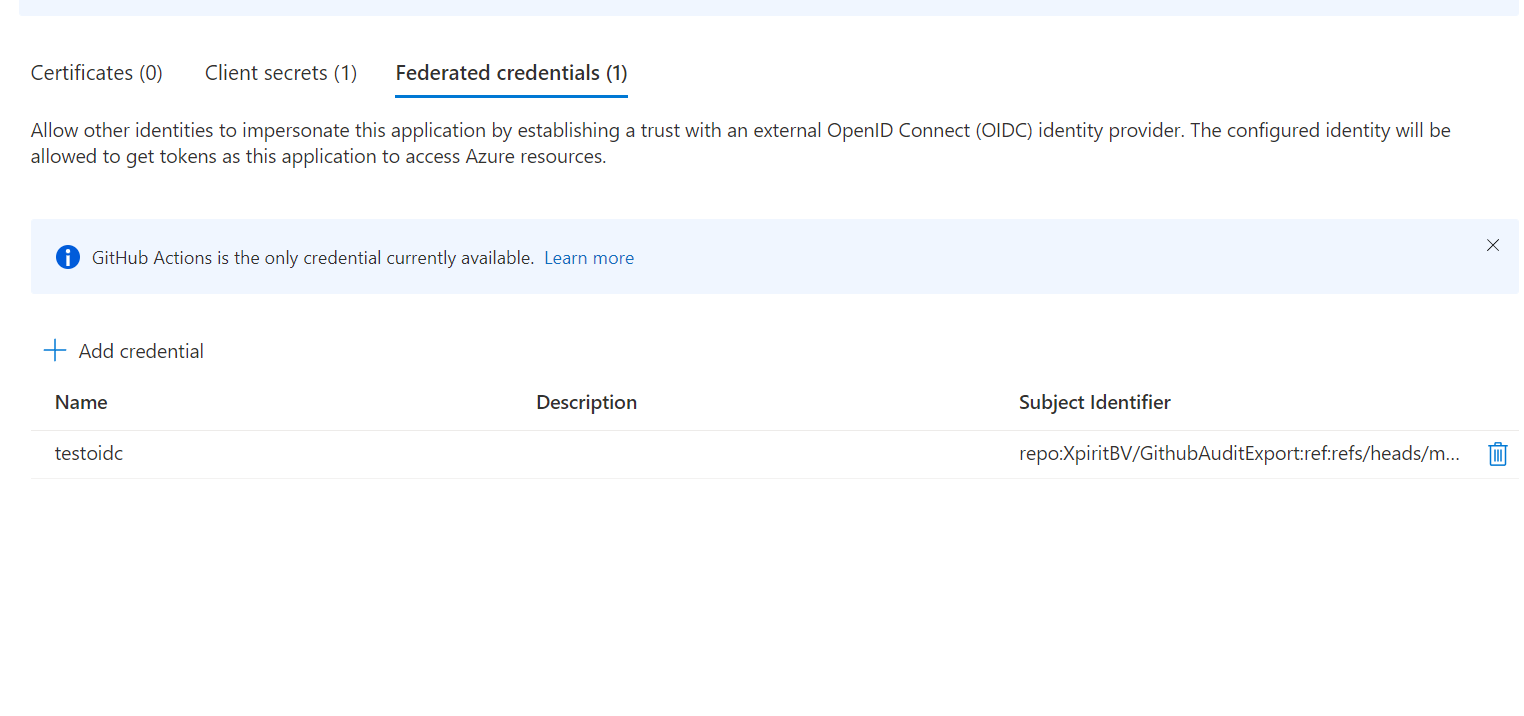
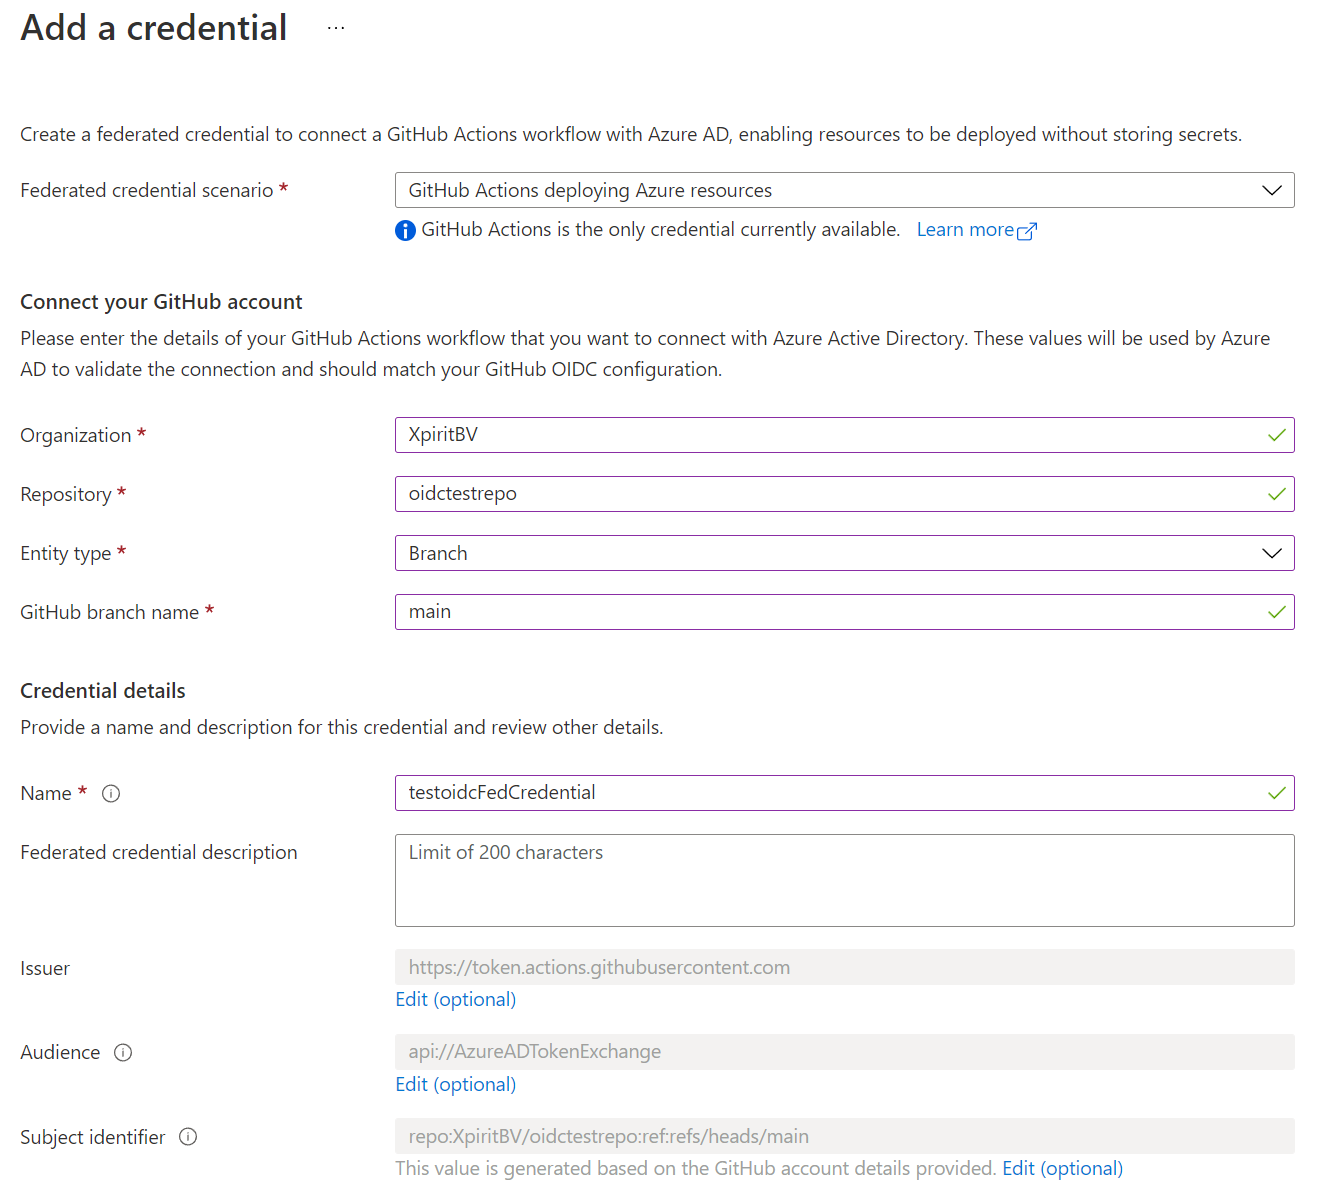
Create a Federated Credential in Azure Active Directory. This is the credential that will be used to login to Azure. Fill in the correct values for your Github Repository.

Federated Credentials creation

Modify Github workflow to use Federated Credentials to login on Azure

After the first step of creating the AppRegistration and Federated Credential you can now modify the Github workflow to use the federated credentials.

A example of the modified workflow is shown below.

1
2
3
4
5
6
7
8
9
10
11
12
13
14
15
16
17
18
19
20
21
22
23
24
25
26
27
28
29
30
31
32
33
34
35
36
37
38
39
40
41
42
43
name: deploy

on:
push:
branches: [ main ]
workflow_dispatch:

permissions:
id-token: write
contents: read

jobs:
deploy_ota:
runs-on: ubuntu-latest
name: Deploy
steps:
- uses: actions/checkout@v2
- name: Install CLI-beta
run: |
cd ../..
CWD="$(pwd)"
python3 -m venv oidc-venv
. oidc-venv/bin/activate
echo "activated environment"
python3 -m pip install --upgrade pip
echo "started installing cli beta"
pip install -q --extra-index-url https://azcliprod.blob.core.windows.net/beta/simple/ azure-cli
echo "installed cli beta"
echo "$CWD/oidc-venv/bin" >> $GITHUB_PATH

# Login to Azure
- name: Azure Login Xpirit
uses: azure/login@v1.4.0
with:
client-id: ${{ secrets.AZURE_CLIENTID }}
tenant-id: ${{ secrets.AZURE_TENANTID }}
subscription-id: ${{ secrets.AZURE_SUBSCRIPTIONID }}

- name: 'Run az commands'
run: |
az account set -s 'Microsoft Azure Sponsorship 2020'
az group create -l westeurope -n rg-githubexporter
az deployment group create -g rg-githubexporter --template-file ./main.bicep --parameters ./parameters.json

The important part is the change to the azure/login@v1.4.0 action. Instead of providing a client secret it is now possible to use the federated credentials. The only information that is needed is the client id, tenant id and subscription id. Because of the trust between Github and Azure Active Directory there is no need for a password/secret anymore.

This sample uses the beta version of the Azure CLI. To install it please visit Azure CLI Beta.

As my colleague Rene van Osnabrugge wrote about on his blog original post it is possible to run your Azure DevOps agent on Azure Container instances (ACI). At Ignite 2018 Microsoft announced virtual network integration for Azure Container Instances. So now it is possible to use a ACI based Azure DevOps agent to deploy into your private network. This post explains the extra things you have to do to make this possible.

Setting up your virtual network

Start by creating a virtual network if you do not have a vnet yet. This can be done using the Azure Portal or the the Azure CLI. With the CLI it can be done using the following command:

az network vnet create -g resourcegroup -n vnetname

after the virtual network is created we have to create a subnet where our Azure DevOps agents will be deployed. This subnet has to have the delegation for Azure Container Instances. Create the subnet using:

az network vnet subnet create -g resourcegroup -n subnetname –vnet-name vnetname –address-prefix subnetprefix –delegations Microsoft.ContainerInstance.containerGroups

After creation the subnet should look like this in the Azure Portal aci subnet.

Deploy your private Azure DevOps agent

Now that the network infrastructure is ready it is time to deploy our Azure DevOps agent. Deploy it to Azure using the Azure CLI.

1
az container create -g <resoursegroup> -n <aciagentname> --image microsoft/vsts-agent --vnet-name <vnetname> --subnet <subnetname> --environment-variables VSTS_ACCOUNT=<vstsaccountname> VSTS_POOL=<vstspoolname> VSTS_TOKEN=<PAT> VSTS_AGENT=<Agent-Name>

After a while the agent should show up inside Azure DevOps.
agent inside Azure DevOps

and inside of Azure
agent inside Azure DevOps

When deploying components on Kubernetes it is best practice to use Kubernetes Ingress as a way to control the traffic to your actual applications. One of the most popular components to use on Kubernetes for ingress is Nginx. My colleague Pascal Naber has written an excellent Post on how to configure Ingress using Nginx. However when you deploy Identity Server and a client web application that uses identity server it fails to do a proper login round trip. You are then presented with the following error
502 Bad gateway.

After some searching around it seems that the request is failing because the response from IdentityServer is to large for the default Nginx buffer size. These buffer sizes can be changes in the nginx.conf file. However because we were using the default nginx-ingress-controller docker image that wasn’t an easy fix.

There were two solutions for this problem:

  • Create your own Nginx Ingress controller docker image with a modified nginx.conf
  • Pass in parameters to our Ingress controller using a Kubernetes configmap

In this case we used an Kubernetes configmap to configure Nginx properly for the Identity Server responses. For Nginx as a reverse proxy to function properly with Identity Server add the following configmap.yaml:

1
2
3
4
5
6
7
8
9
10
11
12
kind: ConfigMap
apiVersion: v1
metadata:
name: nginx-configuration
namespace: ingress-nginx
labels:
app: ingress-nginx
data:
proxy-buffer-size: "128k"
proxy-buffers: "4 256k"
proxy-busy-buffers-size: "256k"
large-client-header-buffers: "4 16k"

You can find all the options for configuration on Nginx configuration.

Make sure to replace any values with your own if you want to use this configmap. Deploy this configmap.yaml with

kubectl apply -f configmap.yaml

The only quirky thing is that you will have to restart your Nginx ingress pods to have them load in the new configuration. However, currently there is no restart option for pods. So you will have to a kubectl delete pod POD_NAME. If you have used the default options when deploying Ingress then Kubernetes will automagically restart your pods when you delete them. Now Nginx ingress runs with the new configuration.

Addendum

If you are deploying .NET Core applications in Kubernetes on Linux behind a reverse proxy such as Nginx then also make sure to configure your middleware correct. Instructions for that can be found at MS Docs.

When running workloads on Kubernetes in Azure you probably want some insights in how your cluster and pods are behaving. In this blogpost I will setup Prometheus and Grafana to get a dashboard going. This post assumes you have a Kubernetes cluster running and configured kubectl to connect to it.

Installing Prometheus

Lets start with deploy the configuration for Prometheus using a config map using :

kubectl create -f prometheus-config-map.yaml

You can find the code for a example config file on Github

Next we deploy Prometheus itself using a Kubernetes yaml file. Create a file named prometheus-deployment.yaml and paste in the following content

1
2
3
4
5
6
7
8
9
10
11
12
13
14
15
16
17
18
19
20
21
22
23
24
25
26
27
28
29
30
31
32
apiVersion: extensions/v1beta1
kind: Deployment
metadata:
name: prometheus-deployment
spec:
replicas: 1
template:
metadata:
labels:
app: prometheus-server
spec:
containers:
- name: prometheus
image: prom/prometheus:v1.8.2
args:
- "-config.file=/etc/prometheus/prometheus.yml"
- "-storage.local.path=/prometheus/"
ports:
- containerPort: 9090
volumeMounts:
- name: prometheus-config-volume
mountPath: /etc/prometheus/
- name: prometheus-storage-volume
mountPath: /prometheus/
volumes:
- name: prometheus-config-volume
configMap:
defaultMode: 420
name: prometheus-server-conf

- name: prometheus-storage-volume
emptyDir: {}

Read More

Last week on the Build 2017 conference in Seattle Microsoft showed how they have added support for Docker compose to Azure Service Fabric. They demonstrated this on stage during a breakout session on day 2.

When you want to try this yourself the getting started is missing a lot of information. In this post, I will try to explain what you have to do to get this running.

First you have to make sure you deploy a Service Fabric cluster in Azure which meets the following prerequisites:

  • Deployed on Windows Server 2016 Datacenter with Containers
  • Has fabric version 255.255.5713.255 or newer
  • Has DnsService deployed and enabled
  • Has port 80 opened on the loadbalancer

After these requirements are met you can deploy a Docker composed application to this cluster using the Azure CLI.

Creating a Cluster

Let’s start with creating a cluster

Read More

The code in this post is build using VS2015 and AspNetCore RC1

Recently we have been looking at Swagger as a way to generate a meta data endpoint for our Web Api’s. You can easily do this by adding the Swashbuckle NuGet packages to you solution.

Setting up Swashbuckle

You start by adding the following packages to your package.json:

1
2
"Swashbuckle.SwaggerGen": "6.0.0-rc1-final"
"Swashbuckle.SwaggerUi": "6.0.0-rc1-final"

Read More

Image of Windows 10 Lockscreen with Spotlight
Do you also like these pictures on the Windows 10 lock screen. Well, you can easily use them as your new wallpaper.

Manual instructions

Go to the folder

1
[C:\Users\<user>\AppData\Local\Packages\Microsoft.Windows.ContentDeliveryManager_cw5n1h2txyewy\LocalState\Assets]

There are the wallpapers located. Copy those files to your pictures directory and give them an JPG extension (make sure to turn View file name extensions on).

Read More